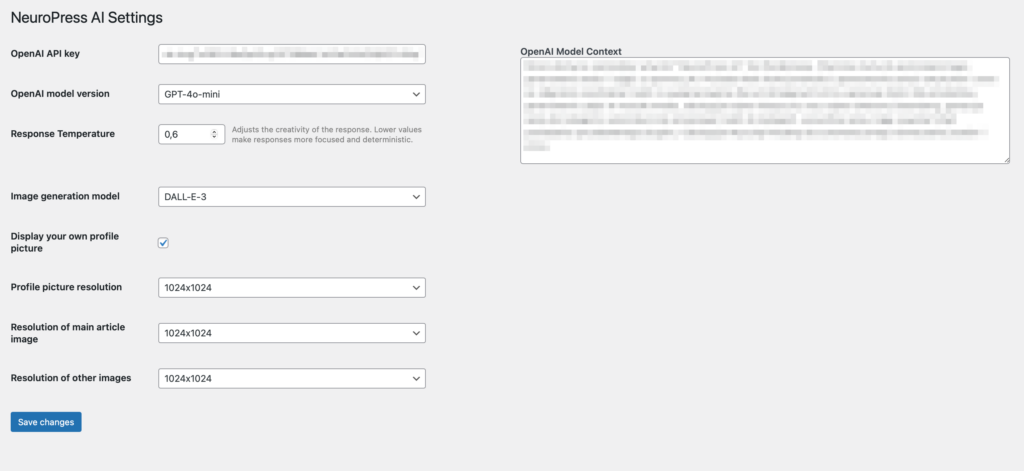
Welcome to the ultimate guide on configuring the NeuroPress AI plugin for WordPress! This powerful tool uses AI to automatically generate content and images, making your website management a breeze. In this article, we will walk you through the setup process step-by-step.

Step 1: OpenAI API Key
To get started, you need to enter your OpenAI API key. This key allows the plugin to access the AI’s capabilities and generate content for your site.
Instructions:
- Navigate to the NeuroPress AI settings page in your WordPress dashboard.
- Locate the field labeled OpenAI API key.
- Enter your API key in the provided field.
Step 2: OpenAI Model Context
Next, you need to set the context for the OpenAI model. This helps the AI understand the type of content you want to generate.
Instructions:
- Find the OpenAI Model Context field in the settings.
- Enter a brief description of your website’s niche or the type of content you need.
Step 3: OpenAI Model Version
Select the version of the OpenAI model you want to use. Different versions may have varying capabilities and performance levels.
Instructions:
- Locate the OpenAI model version dropdown menu.
- Choose the desired model version from the list.
Step 4: Image Generation Model
Choose the model for generating images. This will determine the style and quality of the images created by the plugin.
Instructions:
- Find the Image generation model dropdown.
- Select the preferred model for image generation.
Step 5: Display Your Own Profile Picture
If you want to use your own profile picture instead of the AI-generated one, you can enable this option.
Instructions:
- Locate the Display your own profile picture toggle.
- Switch it on to use your own profile picture.
Step 6: Profile Picture Resolution
Set the resolution for your profile picture to ensure it looks sharp and professional.
Instructions:
- Find the Profile picture resolution field.
- Select your preferred resolution from the dropdown menu.
Step 7: Resolution of Main Article Image
Define the resolution for the main image of your articles. This image will be prominently displayed, so choose a high resolution.
Instructions:
- Locate the Resolution of main article image field.
- Select your preferred resolution from the dropdown menu.
Step 8: Resolution of Other Images
Set the resolution for other images used in your content. This ensures all images are consistent in quality.
Instructions:
- Find the Resolution of other images field.
- Select your preferred resolution from the dropdown menu.
Conclusion
By following these steps, you can configure the NeuroPress AI plugin to suit your needs and start generating high-quality content and images effortlessly. Enjoy the power of AI and take your WordPress site to the next level!