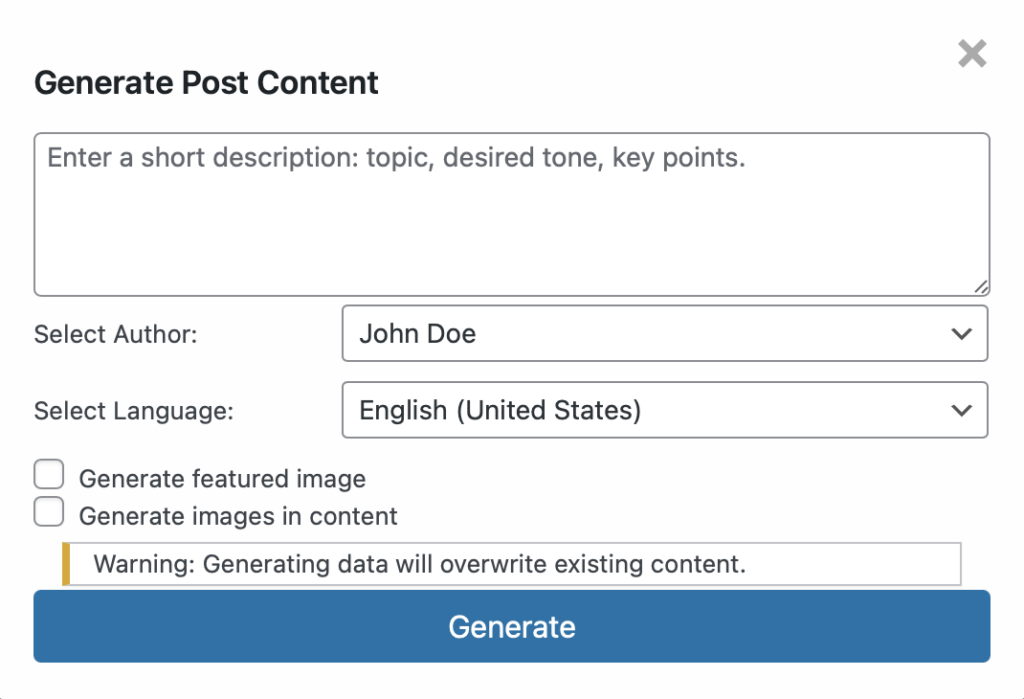

The “Generate with AI” feature in the “NeuroPress AI” plugin allows you to replace the content of existing posts using AI, ensuring your content stays fresh and relevant. Here’s a step-by-step guide on how to use this feature effectively.
Step 1: Enter a Description
Begin by entering a short description in the text box at the top. This description should include the topic, desired tone, and any key points you want the content to cover. This helps the AI understand the context and purpose of the content you wish to generate.
Example:
• Topic: E-commerce Optimization
• Desired Tone: Persuasive and informative
• Key Points: Importance of user experience, SEO best practices, conversion rate optimization
Step 2: Select Author
Choose the author for the post from the “Select Author” dropdown menu. This allows you to assign the generated content to a specific user on your WordPress site. Ensure the author selected has the appropriate permissions to create or edit posts.
Step 3: Select Language
From the “Select Language” dropdown, choose the language in which you want the content to be generated. This feature is especially useful for multilingual sites, allowing you to generate content in the preferred language of your audience.
Example:
• English (United States): Select this option if you want the content in American English.
Step 4: Image Generation Options
The plugin provides options to generate images along with the content. You can choose from the following:
• Generate Featured Image: Check this box if you want the AI to generate a featured image for your post. This image will appear as the main visual representation of the article on your site.
• Generate Images in Content: Select this option if you want images to be included within the content itself. These images can help illustrate key points and break up text for better readability.
Important Warning
At the bottom of the modal, you will see a warning: “Generating data will overwrite existing content.” This means that using this feature will replace the current content of the selected post with the newly generated content. Ensure you have a backup of any important information before proceeding.
Step 5: Generate
Once you have filled in all the necessary fields and selected your options, click the “Generate” button. The plugin will use AI to replace the content based on your inputs.
Reviewing and Editing
After the content is generated, review it to ensure it meets your standards and make any necessary edits. You can enhance the content by adding your personal insights or additional information relevant to your audience.
This guide will help you navigate the “Generate with AI” feature and leverage AI to keep your content up-to-date and engaging.